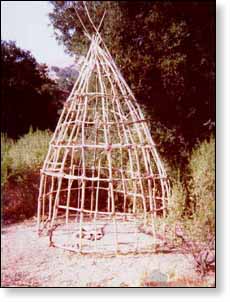
This spring and summer of 1999, we built a watertight, thatched house similar to those used by the First People of the California Bay area. We cut poles using stone tools, dug holes with sharp sticks, and learned how to bind the frame together using all natural materials. This was part of an experimental archaeology project.
1. SITE PREPARATION
After choosing a location, drive a stake into the ground to locate the center of the house floor. Tie a loop of string over the stake, and measure out the radius of the floor circle. Tie a stick to the string at that point and mark the circle on the ground. Locate the doorway away from the prevailing winds. if the floor is to be dug down below ground level, do so, then level and pack hard by pounding with stones (or feet).
Mark, then dig the two doorway pole holes about 3 feet apart, and 18 - 24 inches deep. Then mark off post holes at 18 inch intervals around the circle, adjusting as necessary. (I first divide the circle in half from the center of the doorway, through the center of the floor and to the back wall, and put one post at that spot, spreading the other posts evenly on each side). Dig these holes as with the door poles, or, if the ground is soft enough, drive in a stake, wiggle it around and pull it out, quickly placing the house pole into the hole.
TOOLS - Modern: post hole diggers, hoes, picks, shovels. Ancient: digging sticks, abalones shells or flat rocks.
2. CUTTING THE HOUSE POLES
First locate a stand of willows that are growing straight and tall, (new stands, or stands growing in canyons). Determine the size of your intended house. For a 6 foot diameter house, 8 - 10 feet tall, you will need house poles 1 1/2 inches thick, and 12 - 14 feet tall. For a 9 foot diameter house, 11 13 feet tall, you will need house poles 2 inches thick and 15 17 feet tall. Cutting should be done in the spring or early summer, and with an attitude of appreciation for the willingness of the trees to cooperate with you in your project.
After sufficient house poles plus several extras are cut, remove the side branches and peel the bark. The bark should be removed in strips about 1 inch wide and as long as possible (it is often possible to remove the bark in one or two pieces). Save the bark. The side branches can be used for shade shelters, windbreaks, as kindling, or as binders.
Charring the ends of the house poles will help preserve them against rotting.
TOOLS - Modern: pruning saws, hand clippers and loppers. Ancient: sharp edged stone slab saws, hands.
Note: To use the stone saw, first bend the willow over as far as it will bend, then saw it half way through, then bend it back the other way, and finish sawing.
3. CUTTING THE BINDERS
Additional willow poles will be needed to form the horizontal framework which binds the thatch to the house poles. These binders are long straight willows, 3/4 - 1 1/4 inch thick at the base. Cut enough to go approximately 14 times around the house (excluding ends smaller than 3/8 inch thick). These should be cut and peeled as were the house poles.
4. CONSTRUCTING THE FRAME


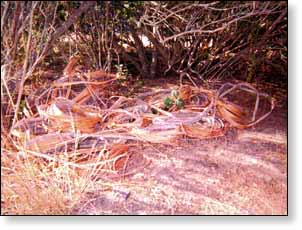
| Dried willow bark awaiting final preparation for use in lashing the house frame. |
From a ladder set up inside the house, pull the house poles together in pairs to the center, and tie them. It helps to have people on the ground bending the poles in while they are tied. The height of the house is determined by the flexibility of the upper ends of the heaviest house poles. The poles can either be tied together where they meet, tied to a circle to form the smoke hole, or overlapped with their opposite to make a more rounded roof.
Beginning at the door poles, tie a horizontal binder to the inside of the house poles, about 6 inches up, using strips of bark to lash it. Tie the binder to each pole until it becomes narrower than 3/8th of an inch, then overlap the next binder pole. Begin with the thick end at the door pole on each side and work to the back of the house. Add another row of binders in the same manner at 24 inches. At 42 inches, the circle of binders will form the top of the doorway. From one of the door poles, lash a binder going across the doorway to form part of the lintel, and continue lashing as usual to each pole. From the other door pole, lash a binder to the outside of both door poles, then to the inside of the remaining poles to form the rest of the 42 inch circle. Continue adding circles of binders to the inside of the house pole frame at approximately 18 inch intervals to the top. You will want to use the thickest binders at the bottom and increasingly thinner ones toward the top.
Above the doorway, there will be a wide gap between the house poles. Reduce this by tying a light house pole between the two binders that cross above the doorway, and lash it to the binders it crosses to the top of the house. Add vertical poles in a similar manner wherever it seems necessary.
Mark the top end of the house pole opposite the doorway, then trim the ends of all the other house poles to about 4 inches above where they are tied together (unless the poles have been overlapped). The one long one will support the smoke hole cover.
TOOLS - Modern: knife, hands. Ancient: stone knife, hands.
5. CUTTING THE THATCH
| The hearty crew in front of one hour worth of tule cutting. |
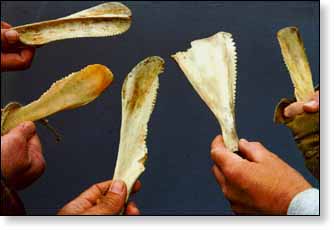
| Deer scapulae saws with notched edges used to cut tules. |
The thatching material is most often thought as being tule
(Scirpus spp.), but was realistically whatever was locally ,abundant
- cattails, reeds, grasses, ferns, brush, or whatever. It is also
possible to mix cattail and tule together in the same house. Before
you start cutting, make sure there is a large supply of your chosen
material reasonably near at hand, as you will end up needing more
than you thought. Because cattail and tule are the most abundant
today, and were commonly used, I will stick to these two to describe
(they're also the only ones I've used myself). The other materials
were used much like cattails, with adaptations for differences
in length and texture.
TULES - There are several members of the genus Scirpus that can
be used for thatching a house, but Common Tule (Scirpus acutus)
and California Bulrush (Scirpus californicus) are the largest
and most abundant. Of the two, Common Tule is tougher, and therefore
preferred, although California Bulrush is green and harvestable
throughout the year while Tule is only cut from June through October.
When cutting in a large stand of tules, it is best to "tunnel"
through them rather than clear cutting large areas, as cattails
will tend to invade the tule beds.
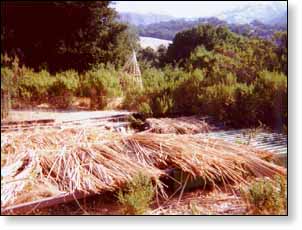
| Five truckloads of tule set out to dry. |
Tules should be cut as close to the ground as possible, and handled with care so the stems do not become bent and broken. I prefer to cut them with a. Japanese hand sickle, but serrated kitchen knives and linoleum knives both work well. Saws made from the shoulder blade of a deer were used prior to European arrival. As the tules are cut, I carefully stack them, with the cut ends together, leaning against uncut tules I have bent over to form a stand. When I have cut enough to make a bundle about 8 - 10 inches thick, I tie the bundle with binder twine at the middle, and near each end so that they may be carried without breaking. The bundles are then placed on a drying rack a foot or more off the ground, and one bundle thick, to allow good air circulation. The rack should be in partial to full shade, and the bundles should be rotated for even drying. If no place is available to lay the tules flat, they can be dried vertically against a building or fence, but care must be given that they don't get knocked over, and broken. Tules need to be dried before using as they will shrink up to half their original diameter, and come loose. They are dry when they are pale green, or straw color.
CATTAILS - Cattails need to be handled with care, but can be
handled without being tied in bundles as long as they are kept
with the cut ends together, and not crossed and broken. When carrying
cattails (or tule bundles), always hold them at near the cut ends,
with the rest of the plant trailing behind. Drying cattails is
similar to tules, except that they can be closer to the ground
and in full sun.
TOOLS - Modern: Japanese hand sickle, linoleum knife, serrated knife, machete. Ancient: deer scapula saw, or obsidian knife.
6. THATCHING
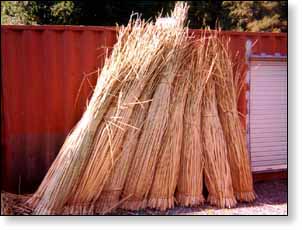
| Eight 8-foot tule mats ready to be tied onto the house frame. |
Three thatching methods are here described as being for either cattail or tule, although either method will also work (though not as well) for the other material.
TULES - Tules were most often applied at least partially twined into mats. Temporary, portable structures are described that were able to be rolled up and carried away, being made of well woven tule mats. In permanent, waterproof houses, completely woven mats would take too much time to make and would be more likely to leak. These winter houses are described below.
Begin by soaking cattail leaves, or split tules in water for the twining. Next, spread out a bundle of dried tules on a clear piece of ground as thick as the mat is to be (2 - 3 inches). Taking three or four strands of wet twining material, twist it into a single ply, then fold this over a 2 - 3 inch bunch of tules 1/3rd of the way along the twiner, and about 6 inches above the cut ends of the tules. Twine each bunch together tightly, as you work your way down the tules. Each bunch should be the thickness that you plan for the mat. Keep adding into the twining material as necessary until the mat is complete. As I twine the mat, it is convenient to roll the finished section up as I go, stopping the mat when the roll becomes difficult to work over (roughly 18 - 24 inches thick). I end the twining by making about 18 inches of rope beyond the edge of the mat. This rope is useful in tying the mat to the house frame. This one row of twining is sufficient to keep the tules from slipping, once on the house.
While enough mats are being made to go around the house 4 to 6 times (depending on the size of the house and how well you want it to shed rain), begin thatching. The first row of thatch sits directly on the ground, so it does not need to be made from mats. Instead, tie a binder pole to one of the doorway poles opposite the 24 and 42 inch horizontals of the frame. Tie it loosely, so that 4 - 6 inches of tule (or cattail) can be packed between it and the house frame. Hold the binder away from the house as you pack in the thatch, with the cut ends on the ground. When about a foot of the circumference of the house has been covered, press the binders against the thatch and tie them to the house frame binders, keeping the thatch an even thickness. If you have enough tules (or cattails), make this first layer as thick as possible (up to a foot thick).
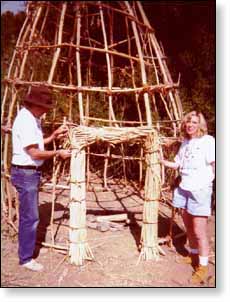
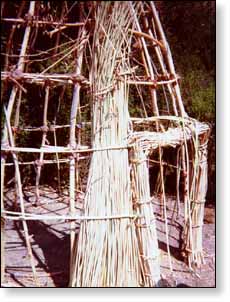
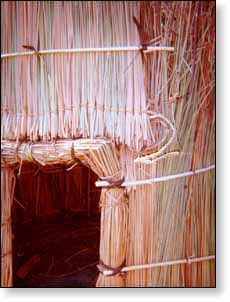
| The first layer of thatch is loose tules, not mats, bound to the frame with binder poles. Subsequent layers of thatch are added as mats, with the binder poles tied through the twining. |
When this first row has been completed to the other side of the door, take two bundles of tules as thick as the first layer, and tie one to each door pole so that the-ends of the binders are covered. Use a thatching needle if necessary to firmly wrap the bundle to the door pole. Bend the top of the tow bundles together to for a single bundle over the top of the doorway and trim to fit. It should hide the wood at the top as the side bundles do below. This top bundle also serves as a platform for thatching. Attach a short binder to one of the door poles where the 60 inch binder crosses it. Pack tules (or cattails) in as was done for the ground level layer, supported by the tule bundle lintel.
Once the foundation layer is complete, begin at your favorite door pole, and tie the exposed end of a rolled tule mat to the house frame at the 24 inch binder (using the tule rope extending from the mat if you did this). Tie a binder on at the same level, and proceed to unroll the mat around the house, with people holding it so that the row of twining stays at the 24 inch level. Tie the binder to the binder pole on the outside of the foundation layer beneath it. Attach a second binder at the 42 inch level and tie this through to the house frame using a thatching needle if necessary.
Proceed around the house in this manner at each 18 inch level, tying a binder over the twining and to the outside binder, and one level higher, tying a second binder through to the inside frame binder. The mat that goes directly above the doorway should be doubled over to compensate for one missing layer. (If 6 layers of mats are being used, they should go between the mats above and below the doorway). Before adding the last two mats, tie binders over the existing thatch to the smokehole. The last to mats should be tied to the outside binders, rather than to the house frame. Finally, trim the tules around the smokehole, and make sure they are tied down well. A smokehole cover may be added at this time if desired - a thick tule mat, of a deerskin, tied over the house pole that was left long for this purpose.
CATTAILS - Cattail thatching begins exactly like tule thatching up to rolling on mats. Cattails can be applied loose. Once the foundation layer -has been completed, and the tule bundles tied to the door frame, tie a binder to the house frame at door top height (or one level lower if the cattails are short, or the door tall) and opposite a frame binder. Leave the binder loose as when adding the foundation layer. As one person holds the binder away from the house, others bring in handfuls of cattails, with the cut ends up, and packs them between the house and the binder, with someone assigned to hold it in place. The cut ends of the cattails should extend about a foot above the binder. Every foot or so, the binder is tied to the house frame using a thatching needle. As this process continues around the house, a second binder is added below the first, and tied to the outside binder holding down the foundation layer (eliminating leaks). This process is repeated at each binder level up to the smokehole. When completed, each layer of thatch is trimmed off below the bottom binder.
Finish by cleaning up, trimming, adding a smokehole cover,
a tule mat for a door, or other additions. The fire should be
built between the door and the center of the house floor, leaving
the back half of the floor for sleeping space.
TOOLS - Modern: thatching needle, clippers, knife. Ancient: thatching
needle, bone saw, stone saw.
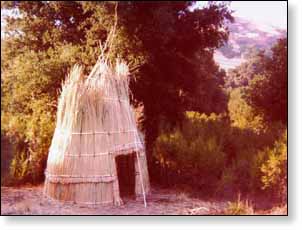
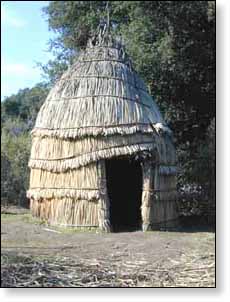
| As complete as it's going to get this year. It still needs one more layer (truck load). Next June, 2000, we will add the last layer of mats. |
E-mail your comments to "Norm Kidder" at atlatl1@aol.com
Also, visit http://OutsideEducators.com/Tule%20House%20Project%20photos1.html to view photos of the construction of a tule house by Outside Educators.
We hope the information on the PrimitiveWays website is both instructional and enjoyable. Understand that no warranty or guarantee is included. We expect adults to act responsibly and children to be supervised by a responsible adult. If you use the information on this site to create your own projects or if you try techniques described on PrimitiveWays, behave in accordance with applicable laws, and think about the sustainability of natural resources. Using tools or techniques described on PrimitiveWays can be dangerous with exposure to heavy, sharp or pointed objects, fire, stone tools and hazards present in outdoor settings. Without proper care and caution, or if done incorrectly, there is a risk of property damage, personal injury or even death. So, be advised: Anyone using any information provided on the PrimitiveWays website assumes responsibility for using proper care and caution to protect property, the life, health and safety of himself or herself and all others. He or she expressly assumes all risk of harm or damage to all persons or property proximately caused by the use of this information.
© PrimitiveWays 2013