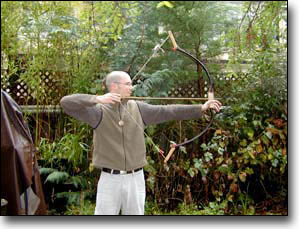
What is an Asiatic composite bow?
It is the most sophisticated and technologically advanced type
of bow, being made entirely of natural materials like wood, horn,
sinew, and hide or fish glues. These type of bows have been developed
in multiple styles all over Asia and were in use until slowly
replaced by firearms. Several of these bows are still being made
by professionals today.
This is the first bow of this type I have made and it was more of a learning process than anything else. I was able to make a bow that shoots and did not break, but it was a far cry from a masterpiece.
After having made a number of selfbows and sinew backed recurves, this king of bows was always in the back of my mind. Over the years, I collected materials and read articles and books on the subject and it seemed harder and harder to actually make one. Then suddenly, while my lovely wife was on a trip to India, the time was right.
I did not replicate a certain bow or any specific style of bow, but opted to make a bow that would be on the safe side, that would not break or warp and be reliable to use.
This article will be on the work process only and not on composite bows in general.

Getting started:
The Horn Strips
The length and width of the bow were pretty much determined
by the pieces of horn I could cut from the gemsbok horns (Africa)
that I had ordered.
The horn was split down the center into two halves with a hacksaw,
while being held in a vise. The solid tips and the somewhat thin
and frizzy ends were cut off, so that I ended up with two pieces,
19 inches long. Then the rippled outside was worked smooth with
a coarse file and the inside was shaved down with a homemade tool
held at a 90 degree angle, in order to achieve an even thickness
of ca. 3/16 inch.
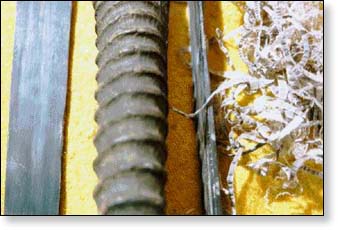
This was many hours of work already, but now the fun starts.
Bending those pieces into nice flat strips that actually end up
looking like store bought pieces of fiberglass. What an amazing
transformation!!!
By boiling the horn and clamping it down flat, it will stay in
that shape once cooled. I used a big square aluminum foil dish
and put it over two flames on our kitchen gas stove. In my case,
the horn is being clamped between two solid flat surfaces like
a block of wood and a metal strip.
If you put your C-clamps right on the horn, you will get some
deep dents. Now place the whole assembly under boiling water with
only the C-clamps sticking out so you can gradually tighten them
while the horn softens. I boiled the hell out of the horn and
it was not damaged! Refill your pan with hot water when necessary
. It took a while of fiddling with those clamps while steam was
fogging up my glasses. I burned my fingers on the hot pan and
almost got boiling water on my feet. Imagine the workshops back
then, where they were working on batches of 500 bows at a time.
Once I got those pieces 90% flat, I took a knife or file and filed
them into nice rectangular strips. I then shaved the horn strips
to their final thickness of 2/16 inches. The final dimensions
were: 19 inches long, 2/16 inches thick, and tapering from 1 inch
to 1 5/8 inches wide
Hey, look at those two neat strips!!!.
The Wood Core
I used rock maple for the core. Moreover, as with a piece of wood for bow making, the grain should run straight. I did cut it with a table saw into a rectangular strip of 2/16-inch thickness. That's it!!
The Handle
The handle will be glued to the back of the bow and not to
the belly as with self-bows.
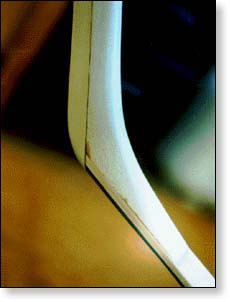
Some bows have an extreme reset in the handle, but I settled on
ca. 20 degrees because more reset would stress the limb-handle
connection more and make the bow unstable.
The question of how thick, how wide and how long of a handle to
make takes some playing with those variables. I tend to make them
fairly chunky because weight in the handle does not slow down
the arrow. I feel it adds weight to the bow where it is permissible
and so adds stability (any comments?).
I make bows symmetrical, meaning no long and no short limb and
I shoot from the center just holding the bow lower in the handle.
Why? I don't know. The handle ended up to be ca. 6 1/2 inches
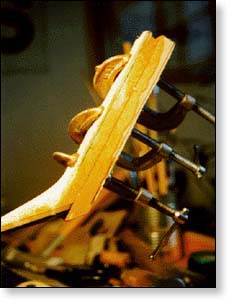
long, 1 1/8 inches wide and 1 1/2 inches deep. I steamed the wooden
core and clamped it to the handle. After it cooled and dried,
I glued the pieces together with epoxy.
Gluing Horn to Core
Epoxy sounded like one more safety feature. I did not have
the nerve to play with fish glue!
I made the horn reach ca. 1 inch into the handle and filled the
space between the two horn strips with a piece of sheet brass.
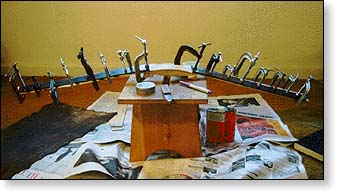
Again to add weight to the bow. I used metal straps as support
for an even gluing and 8 clamps on each limb. After that, cut
the excess wood to match the horn. At this point, I used rawhide
to bind the handle-core-horn connection, as this area will undergo
a lot of stress.
The Ears
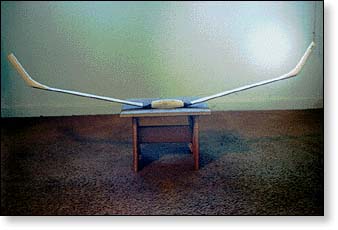
Spruce is recommended for its lightness and stiffness, so I
opted for 6 inches long ears coming of at an angle of 45 degrees.
I made them out of two parts, to leave the limbs as long as possible
and to get an extra glue line. Next time, I will use a less complicated
way of making them. However, at this point I did not want any
part to break off or separate when I string that bow up.
The grain ran nice and parallel with the ears and they ended up
being just under 1 inch thick and tapering from 1 inch to 1/2
inch at the tips. I also bound that ear limb connection with rawhide
strips.
Sinewing
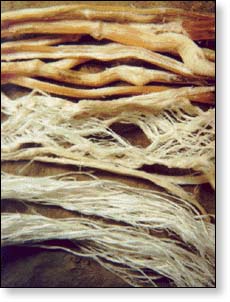
I used roughly 8 deer backstraps and 7 leg tendons. I sinewed
the bow the same way I would sinew any other bow. Two layers were
put down. Then I waited 7 days and put on another two layers.
My hide glue was rabbit skin glue from the art store. Before putting
down the sinew, I pulled the bow into more of a reflex and secured
it with a string between the tips. In addition, I bound the handle
and ear areas some more to hold down the sinew. I took a 4 week
break while everything was drying!
After removing the string between the tips, the bow measured 18
inches of reflex between handle and ears. On one side of the handle,
an air bubble had developed between sinew and wood core. The sinew
probably pulled up while shrinking, even with it being bound down.
After some debating of what to do, I did not touch it at all and
oddly enough, the bubble seemed to have disappeared.
The misalignment of the limbs that occurred and seemed to come
out of the handle area might have something to do with that flaw,
but unfortunately, I did not mark if it was left or right of the
handle. So my advice is, always mark the areas where some irregularities
appear, so that you might learn something if that area later ends
up being a weak spot.
The Covering
I did not sand the sinew smooth but covered both limbs with thin homemade goat rawhide that I had dyed brown with black walnut husks. I slightly soaked the hide and then just laid it on, overlapping onto the horn. No binding was necessary. The handle area is covered with a dehaired road kill squirrel skin (finally, I found some use for that tiny hide).
The Bridges
They were made of two oval pieces of thick leather each. I soaked the parts in hide glue and then clamped them together to dry. This makes a nice hard fileable leather. I concaved one side to receive the string and the other side was ground to fit the knee of the ears. Elmers glue held them in place. They are 1 1/8 by 1 13/16 and 1/2 inch thick more than I needed actually.
The Nocks
For the string nocks, I cut a square section out of the ears, a little less than half way through and glued in a piece of horn with a groove just deep and wide enough to hold the string. This is another area that receives a lot of stress. Cutting the nocks any deeper was somewhat scary.
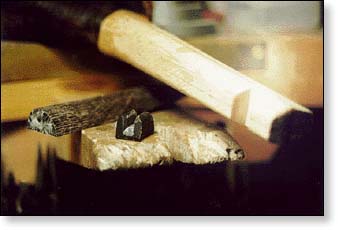
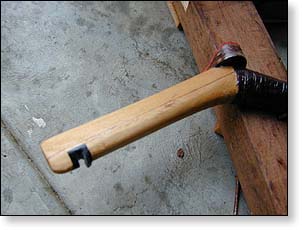
The whole bow got three coatings of homemade varnish, made from finely ground pine pitch dissolved in alcohol. It looked great and had a wilderness smell.
And now, I'm finally done!!!
Nevertheless, the worst part is stringing that thing. I had tremendous respect for the weapon I created after I had read how powerful these tools can be and what a procedure it was to string them.
Stringing the Bow
So far, I have not spent much time on the bowstring. I replicated
a Korean bowstring made out of separate pieces for the loops,
tied onto the main string. But the knots for tying seem to stretch
out, so I will have to wait for some advice from the pros.
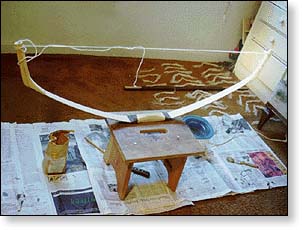
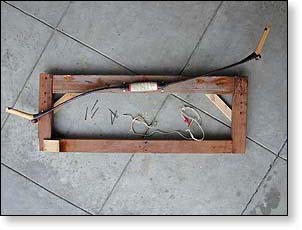
I nailed together a crude stringing jig, put the bow on it, got
all breakable things out of the way, locked the dog up, put on
full body armor, and strung the thing up. I gradually pulled it
over a couple of days. Everything was fine, no cracking, no nothing.
BUT! The limbs are not perfectly aligned and the bow only draws
about 40 pounds at 32 inches. (I have no problems with finger
pinch with the bow being 55 inches measured along the belly) Therefore,
it seems to be a fairly slow shooter. In addition, the reflex
came down from 18 to 10 inches after a while. How those guys get
the tips to touch is still a mystery to me.
Heat Treating
To align a composite bow, it needs to be heated and clamped into the desired shape. Taking horn off the belly is the last thing you want to do. So, what I tried was a localized heat box. Meaning, I put a piece of wood and C-clamp in place (limb seemed to come off at a wrong angle from the handle) and encased the whole area with cardboard and tape. I left an opening for a hair dryer. Also, the top of the C-clamp was sticking out. While the heat inside build up, I gradually tightened the clamp. After a cooling down period overnight, I restrung the bow and it looked pretty good. However, after a day of shooting, the problem came back. I need help from the pros!!!
All in all, this bow is a beautiful piece of work and I marvel at the combination of materials, each doing its share and fitting into the whole. Nature at its finest, once more showing me again that everything is connected and all things work together as one.
With this, I will leave it.
My thanks to the three volumes of the Bowyer's Bible and Tim
Baker for his telephone counseling.
Check out these web sites for more infomation on composite bows:
- www.student.utwente.nl/~sagi/artikel/
- www.atarn.org
E-mail your comments to "Markus Klek" at markusklek@yahoo.com.
Markus Klek resides in Germany.
We hope the information on the PrimitiveWays website is both instructional and enjoyable. Understand that no warranty or guarantee is included. We expect adults to act responsibly and children to be supervised by a responsible adult. If you use the information on this site to create your own projects or if you try techniques described on PrimitiveWays, behave in accordance with applicable laws, and think about the sustainability of natural resources. Using tools or techniques described on PrimitiveWays can be dangerous with exposure to heavy, sharp or pointed objects, fire, stone tools and hazards present in outdoor settings. Without proper care and caution, or if done incorrectly, there is a risk of property damage, personal injury or even death. So, be advised: Anyone using any information provided on the PrimitiveWays website assumes responsibility for using proper care and caution to protect property, the life, health and safety of himself or herself and all others. He or she expressly assumes all risk of harm or damage to all persons or property proximately caused by the use of this information.
© PrimitiveWays 2013