Overview
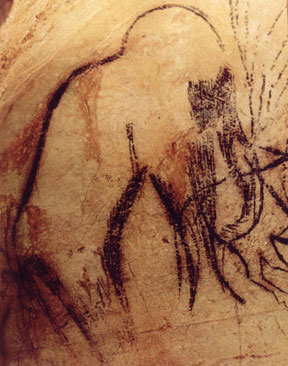
In this paper we will explore the materials, processes and techniques used by Paleolithic peoples to illustrate the animals in which they shared their world. We will use European cave art as our starting point, but expand to include the rest of the world as the materials and techniques that are explored, are pandemic.
Natural Mineral Pigments
What is a pigment? A pigment is in its simplest form is a finely powdered mineral, i.e. colored earth, that is mechanically bound to a surface with a binder. Dyes on the other hand are chemically bound to a material generally with the use of a mordant (alum, chromium, copper, tin and iron.) This paper will focus on ground mineral pigments, binders and application methods.
Listed below are the most commonly used colors in rock paintings around the world. Other colors like blues and greens were used, but very rarely. Blues and greens could be composed of toxic materials. We will focus on those colors that are easily found and processed and that are safe to use. There are always exceptions. Learn what your local materials are made of, and be careful. An extensive list of dangerous materials can be found in Bulletin of Primitive Technology #15 "The Dirt On Colors".
Colors
The range of natural occurring earth colors is truly remarkable. Literally every color of the visible spectrum can be found. Below is a list of the most common and readily available materials that can be found in most places of the world.
RED: Iron oxide, also known as red ocher, hematite or
more commonly as rust.
YELLOW: Also iron oxide, also known as yellow ocher or
limonite. A trick that ancient peoples around the world knew,
was if you heat up yellow iron oxide in a camp fire, it will turn
from yellow to orange, then to bright red!
BLACK: Wood charcoal. Soft woods generally are easier to
use than hard woods. Other common materials were manganese dioxide
and natural graphite which was used after breaking it down by
heating it. Both manganese dioxide and graphite are common through
out the world. Another preprocessed black, is soot, which can
be collected from burning pine resin. This is the process in which
black (lampblack) is created for use in India ink and for the
ink blocks used in Japanese and Chinese calligraphy.
WHITE: Clay known as KAOLIN clay, or porcelain clay. White
could also be chalk, gypsum, diatomaceous earth, burned bone or
shell.
Red, Yellow, Black and White. These are the 4 colors that make up the pallet of most native cultures around the world. As mentioned above, these are also the most commonly occurring colors around the world.
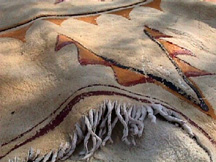
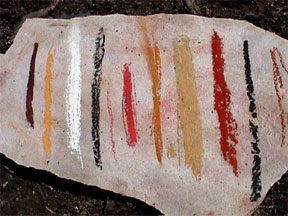 Brilliant
natural colors from the earth. These beautiful streaks
represent raw un-processed pigment samples. All of the mineral
pigments shown in this picture were collected off the ground from
locations in multiple states. Each was oxidized and soft enough
to make these colorful streaks with very little pressure.
Brilliant
natural colors from the earth. These beautiful streaks
represent raw un-processed pigment samples. All of the mineral
pigments shown in this picture were collected off the ground from
locations in multiple states. Each was oxidized and soft enough
to make these colorful streaks with very little pressure.
Colors from left to right:
Rich Brown: Red Ocher/Haematite (iron oxide) Amador County,
CA.
Yellow: Yellow Ocher/Limonite (iron oxide) Alameda County,
CA.
White: Diatomaceous Earth, Southern OR.
Black: Charcoal
Pinkish Red: Cinnabar (mercury sulfate), Santa Clara County,
CA.
Golden Yellow: Yellow Ocher/Limonite (iron oxide) Plumas
County, CA.
Flat Yellow: Yellow Ocher/Limonite (iron oxide), Placer
County, CA.
Bright Red: Red Ocher/Haematite (iron oxide), Iron Point
Road along I-80, NV.
Black: Graphite, ?, CA.
Dark Red: Red Ocher/Haematite (iron oxide), Alameda County,
CA.
Processing
To convert a raw mineral into usable pigment is only a matter of grinding it into a very fine powder. Sometimes, if the mineral pigment has been exposed to the air and is oxidized, soft and in a pure enough form, little or no processing would be needed. In many cases, a pigment can be found ready to use out of the ground. In the famous cave paintings in Lascaux France (http://www.culture.fr/culture/arcnat/lascaux/en/), hundreds of pigment "crayons" were discovered there. They were found to be pure pigment cut directly from the earth and shaped. More recently a discovery was made in the Blombos Cave archeological dig site in South Africa dated at 70,000 years old (http://naples.cc.sunysb.edu/CAS/cape.nsf/pages/blombos). A piece of red ocher had been carved out of a deposit several miles away from the cave, and was again shaped like a large crayon or piece of chalk. Evidence of scraping on the red ocher from both the French and South African sites show us that our ancestors had been storing the red pigment in this form, then removing only what they needed for a particular project.
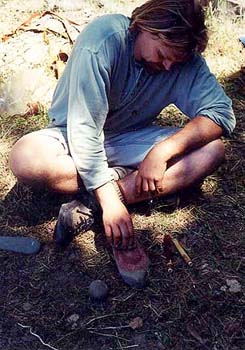 Some times though,
mineral pigments are very hard and have to be processed. This
is done by grinding the mineral using a mortar and pestle (molcahjete)
or simply a flat hand stone called a muller or mano, on a larger
flat stationary stone (metate). The material being ground can
be left dry or water can be added to help keep the fine particles
from scattering as it is being processed. This is a tedious task,
but knowing that not all of the mineral material need be perfectly
ground to make it usable can help us to persevere.
Some times though,
mineral pigments are very hard and have to be processed. This
is done by grinding the mineral using a mortar and pestle (molcahjete)
or simply a flat hand stone called a muller or mano, on a larger
flat stationary stone (metate). The material being ground can
be left dry or water can be added to help keep the fine particles
from scattering as it is being processed. This is a tedious task,
but knowing that not all of the mineral material need be perfectly
ground to make it usable can help us to persevere.
One method of separating the finely ground pigment from the courser material is done using a process called settling. The powdered mineral is poured into a container of water. The water is then stirred to mix the ground pigment thoroughly through the water. The heavier particles of pigment will begin to settle to the bottom, while the lighter, finer particles remain suspended in the liquid. The amount of time given for the heavier particles to settle, will determine the consistency of the finished pigment; less settling time gives a courser pigment, more settling time results in a finer pigment. Usually, after less than a minute, the water with the lighter pigment particles is carefully poured off into another container and allowed to settle to the bottom. The fine pigment will settle to the bottom of this new container leaving the remaining water perfectly clear. Only now, should this clear water be carefully poured off and the remaining moisture in the wet pigment be allowed to evaporate away. The pigment that is left is fine and of uniform size. When it is completely dry, the finished pigment is then ready for use or storage.
Storing and Shaping
Once the pigment is processed, it can be stored in a number of ways. Containers that can be used to store powdered pigments include bamboo sections, hollow bones with the ends sealed, hollow elderberry (Sambucus mexicana) branch sections and buckskin leather bags. Historically though, Native Peoples would form the processed pigments into a ball or cake. This was also the usual method for storing pigment for trade. Strong evidence supports the theory that pigments were traded far and wide, sometimes over a thousand miles as with the cinnabar (true crimson or mercury sulfate) from the New Almaden mines near San Jose, California.
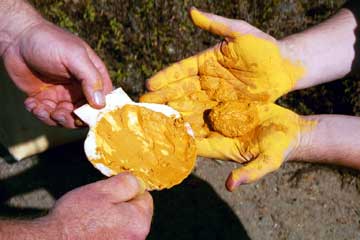 If the pigment is
clay based, then the only thing that would need to be done, is
to add water to the processed pigment to make it stick together.
If the pigment was a pure mineral, then a small amount of glue
should be added to the water to help it hold its desired shape.
In addition to plant juices such as soaproot (Chlorogalum pomeridianum)
glue and milkweed (Asclepias sp.) sap and various nut and seed
oils, animal based glues may have been used. I have had very good
success using a very thin mixture of hide glue. Hide glue which
is also known as rabbit skin glue or horse hoof glue was traditionally
made from cooking down all of the left over parts after an animal
was butchered. Skin, bones, tendons etc. were cooked until they
were reduced to basically solids, fats and gelatin. It is the
gelatin that makes the glue. KNOX brand unflavored gelatin works
great. Seaweed based gelatins are also available and work just
as well.
If the pigment is
clay based, then the only thing that would need to be done, is
to add water to the processed pigment to make it stick together.
If the pigment was a pure mineral, then a small amount of glue
should be added to the water to help it hold its desired shape.
In addition to plant juices such as soaproot (Chlorogalum pomeridianum)
glue and milkweed (Asclepias sp.) sap and various nut and seed
oils, animal based glues may have been used. I have had very good
success using a very thin mixture of hide glue. Hide glue which
is also known as rabbit skin glue or horse hoof glue was traditionally
made from cooking down all of the left over parts after an animal
was butchered. Skin, bones, tendons etc. were cooked until they
were reduced to basically solids, fats and gelatin. It is the
gelatin that makes the glue. KNOX brand unflavored gelatin works
great. Seaweed based gelatins are also available and work just
as well.
Like Jell-O, hide glue is solid at room temperature so it must be heated to make it liquid. You only need to add a little hide glue in the warm water you will use to form our pigment shapes. After the cakes or balls have been formed and allowed to cool, they will be firm and fairly waterproof. As you need a color for a project, you will only have to scrape off as much as required.
Application
Now that you have usable, storable pigment, you need a binder to apply it to whatever surface you want to decorate. The simplest binder is water. In fact, when it comes to cave painting, tests have shown that cave water is the best thing to use. What if you don't want to do a cave painting? The questions you have to ask yourself are: What is the material that you are applying the pigment onto? How long do you want it to last? Will it need to be water proof or at least water resistant? Answers to all these questions determine the binder that will be used. The basic rule of thumb for applying pigments onto any surface is: The binder should be as similar a material you can find as the material you are applying it to. Plant based oils, juices and saps on woods and plant fibers, animal based oils, fats, egg yolks, eye and hide glues on hides, skins and bones. Experience using hide glue and milkweed sap as a binder, have shown them to be water resistant on a variety of surfaces. Binders are as varied as the cultures that used them. Local materials would have been known and used. A good example is the binder used by the Chumash Indians of Southern California, to produce their wonderful polychrome cave paintings. It is believed that they used a combination of milkweed sap and wild cucumber (Marah fabaceus) seed oil as a binder.
Once you have decided on a binder, the paint can be applied in a number of ways: brushed, daubed or sprayed to name a few. Brushes can be anything that transfer the paint to the material surface. The oldest and most handy is your finger as evidenced in the creating of many of the cave paintings and tracings of Paleolithic Europe.
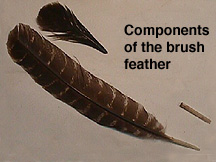
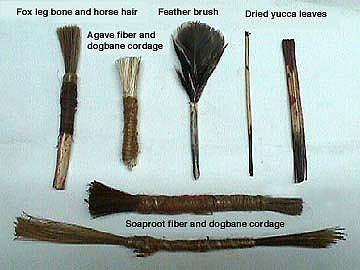 The brushes shown
are made of the following: Soaproot (Chlorogalum pomeridianum)
fibers bound together with hand made dogbane string (Apocynum
canabinum) ; dried yucca (Yucca sp.) leaves lightly pounded and
separated; agave (Agave deserti) fiber bound with dogbane string;
a turkey feather tip in a handle made from the bottom, thick,
but hollow quill of the same feather; a horse hair brush with
a fox leg bone handle. Moss or fur can be used to daub and blend.
A pointed stick or bone also works quite well. Again, local materials
and customs dictate the range of materials that could have and
would have been used.
The brushes shown
are made of the following: Soaproot (Chlorogalum pomeridianum)
fibers bound together with hand made dogbane string (Apocynum
canabinum) ; dried yucca (Yucca sp.) leaves lightly pounded and
separated; agave (Agave deserti) fiber bound with dogbane string;
a turkey feather tip in a handle made from the bottom, thick,
but hollow quill of the same feather; a horse hair brush with
a fox leg bone handle. Moss or fur can be used to daub and blend.
A pointed stick or bone also works quite well. Again, local materials
and customs dictate the range of materials that could have and
would have been used.
Many of the beautiful rock art images found in the European caves as well as the myriad of hand stencils from around the world, were made by spraying the pigment out of the artists' mouth sometimes through a tube. Any hollow tube of approximately .25 inch (6 cm) diameter will work; bird or animal bones, bamboo, reeds etc. You can also blow the pigment out of our mouth without using a tube. Although I haven't found this technique as controllable, the Australian Aboriginal people still use this method today. (!Caution! When spraying any pigment out of your mouth, make sure your binder does not contain any harmful materials, i.e.: poisonous or toxic plant saps, juices, etc.)
 In experimenting
with both spraying methods, I have had the most success using
a tube to spray the liquid pigment. I start by sipping a small
amount of liquid pigment into my mouth. I then cup my tongue to
make a trough or reservoir to hold the pigment in one place. Taking
a deep breath, I position the tube directly over the pigment.
I begin to blow air out through the tube while lowering it closer
to the pigment cupped on my tongue and/or raising my tongue up
to the tube. When the tube is close enough to the pigment it will
begin to be sucked up, mixed with the air, atomized and projected
onto the surface of what I am painting. There are many variables
when using this technique such as: pigment thickness, tube diameter
and length and force of breath. By changing these variables and
with practice, you can achieve a finely sprayed, very controllable
end result. Trial and error (albeit messy) is the best way perfect
this ancient method of pigment application.
In experimenting
with both spraying methods, I have had the most success using
a tube to spray the liquid pigment. I start by sipping a small
amount of liquid pigment into my mouth. I then cup my tongue to
make a trough or reservoir to hold the pigment in one place. Taking
a deep breath, I position the tube directly over the pigment.
I begin to blow air out through the tube while lowering it closer
to the pigment cupped on my tongue and/or raising my tongue up
to the tube. When the tube is close enough to the pigment it will
begin to be sucked up, mixed with the air, atomized and projected
onto the surface of what I am painting. There are many variables
when using this technique such as: pigment thickness, tube diameter
and length and force of breath. By changing these variables and
with practice, you can achieve a finely sprayed, very controllable
end result. Trial and error (albeit messy) is the best way perfect
this ancient method of pigment application.
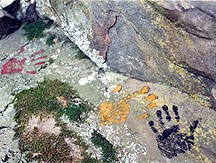
Using your hand or a piece of bark or raw hide, can provide a stencil for creating many complex shapes. This technique was used by Paleolithic people in Europe in many instances to create very detailed images of a variety of animals by both spraying and daubing.
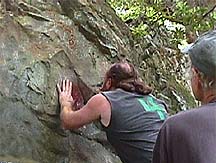
To me, the negative or positive hand print is the most universal way of saying "a human was here!"

Conclusion
These materials and techniques may be simple, but they are the result of thousands of years of experimentation. Some of the most beautiful cave paintings in Europe are over 30,000 years old. The piece of red ocher from the Blombos Cave was engraved with geometric designs over 70,000 years ago. For countless generations Indigenous peoples around the world have used these techniques and processes to decorate their world for personal, aesthetic and spiritual purposes.
References:
Baun, Paul G. and Vertut, Jean
1998 Journey Through The Ice Age. University of California Press,
Berkeley - Los Angeles.
Campbell, Paul
2002 Personal Communication.
Confalonieri, Joel
2001 Personal Communication
Grant, Campbell
1967 Rock art of the American Indian. VISTABOOKS, Dillon Co.
Grant, Campbell
1965 The Rock Paintings Of the Chumash. Santa Barbara Museum of
Natural History, Santa Barbara CA.
Edholm, Steven and Wilder, Tamara
1998 The Dirt on Colors. Bulletin of Primitive Technology No.
15, 1998
This article was first published in The
Bulletin of Primitive Technology (Fall 2002, #24)
This version on the website has many additions and more complete
information.
E-mail your comments to "Chuck Kritzon" at chuckk@petroglyphics.com
We hope the information on the PrimitiveWays website is both instructional and enjoyable. Understand that no warranty or guarantee is included. We expect adults to act responsibly and children to be supervised by a responsible adult. If you use the information on this site to create your own projects or if you try techniques described on PrimitiveWays, behave in accordance with applicable laws, and think about the sustainability of natural resources. Using tools or techniques described on PrimitiveWays can be dangerous with exposure to heavy, sharp or pointed objects, fire, stone tools and hazards present in outdoor settings. Without proper care and caution, or if done incorrectly, there is a risk of property damage, personal injury or even death. So, be advised: Anyone using any information provided on the PrimitiveWays website assumes responsibility for using proper care and caution to protect property, the life, health and safety of himself or herself and all others. He or she expressly assumes all risk of harm or damage to all persons or property proximately caused by the use of this information.
© PrimitiveWays 2013