
Memories of the Northwoods mean many things for me, having spent over fifteen years visiting my in-laws' cabin alongside Pokegama Lake in northern Wisconsin. I fondly recall spending many hours exploring this beautiful area in both winter and summer, and learning about a whole range of plants not encountered here in California. Since the cabin was located within the Ojibwe reservation, I found myself learning all I could about the Native culture, crafts, and people of the area.
Being a devoted primitive technology fan, I was delighted to learn that a fellow enthusiast lived less that a half hour drive from our cabin. This fellow's name is Richard Schneider, a retired art instructor, potter, and author of numerous books, including the well-known "Crafts Of The North American Indians - A Craftsman's Manual". Over the years I was fortunate enough to get to know Richard ("Dick") rather well, and spent many enjoyable days taking his classes, learning everything from birch-bark basketry to the use of the "schnitzelbank", or shaving horse.
Twice while attending Dick's folded-bark basket classes, I was the only participant. It was great having all that one-on-one attention and instruction! Not all the techniques and tools used were primitive, but the following describes the class as I was taught, and will produce a nice basket.
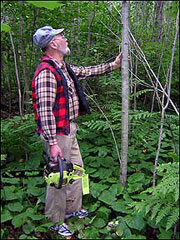
First we went off into a beautiful patch of Dick's northwoods acreage to gather our raw material. After looking at a number of trees, we selected a young "pople" (Populus sp.) about 5 inches in diameter and maybe twenty feet tall. This plant is considered to be a "weed tree", having taken over large areas that have long since been logged off. After felling the tree, we trucked it back to Dick's yard where we cut it into sections about two feet long. This length can vary, depending upon how long you want your finished basket to be. The finished piece will be roughly 1/2 the length of the initial log section. As always, be sure to get permission before harvesting your wood, or harvest from your own or a friend's property.
Although we used poplar, a number of tree species will work for this purpose, including tulip tree (Liriodendron tulipfera), Ash (Fraxinus sp.), and a number of conifers. The trick is to harvest during the most active growing season (spring through early summer), when the bark separates easily from the underlying wood.
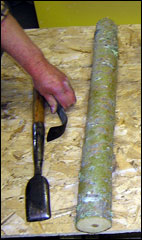
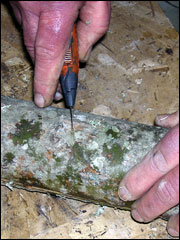
 Next,
a straight cut is made lengthwise through the bark of the piece.
An exacto knife, pocket knife, or even stone knife can be used
for this purpose, although for starters I recommend the metal
blades. Using your fingertips, slowly work them up and underneath
the bark to carefully separate it from the wood beneath. This
should go fairly smoothly if good, actively growing wood was selected,
but you may need a putty knife to help separate those difficult
areas. Once completed, you should have a loose, tube-shaped sheath
of bark that moves easily over the underlying log. Leave the bark
on the log for the next step.
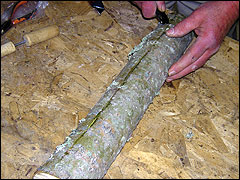
Next,
a straight cut is made lengthwise through the bark of the piece.
An exacto knife, pocket knife, or even stone knife can be used
for this purpose, although for starters I recommend the metal
blades. Using your fingertips, slowly work them up and underneath
the bark to carefully separate it from the wood beneath. This
should go fairly smoothly if good, actively growing wood was selected,
but you may need a putty knife to help separate those difficult
areas. Once completed, you should have a loose, tube-shaped sheath
of bark that moves easily over the underlying log. Leave the bark
on the log for the next step.
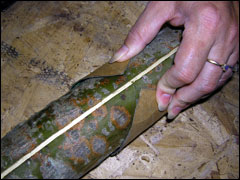
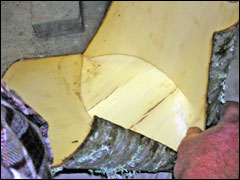
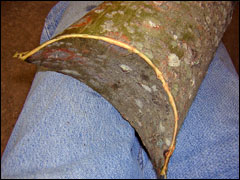
Measure to find the middle (lengthwise) of the "bark tube" and mark that spot near one of the cut edges. From thin cardboard, fabricate a "lens"- shaped pattern that fits nicely around the circumference of the bark, wrap it around at the midpoint, and trace around this form with a pencil. Now, using your sharp blade, carefully cut along this line. Note: This is a bit tricky to describe, since too shallow a cut will make the bark bending difficult, and too deep a cut will cause the bark to separate - about halfway through is a good measure. You may want to practice cutting and folding with some scrap pieces before going on to your basket piece.

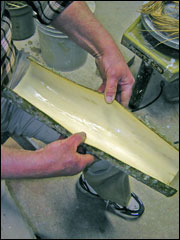
Now it's time to shape your basket! Slide out the log and place the bark on your leg as shown. Slowly bend the insides of the bark up and together, using your hands to help the cut lines bend. As the ends come together at the top, they should overlap about 3/4 inch. Pinch these areas together with clothespins while you prepare your sewing materials (Possible primitive substitute for clothespins: short split-sticks with binding on the unsplit end or the fingers of a willing assistant).

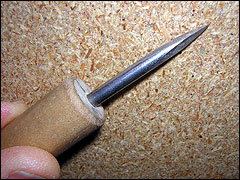
Sewing up your basket will require a pointed awl of either natural material (bone, wood, or antler) or metal. Dick and I used a nice design of his made by grinding a heavy-duty nail on three sides to a tapered, sharp point. The resulting cross-section is triangular. This design is helpful since the sharp edges tend to cut rather than tear through the bark. Next, you'll need material to sew or lace together your basket. We used commercial caning and split pine root for ours, but any good conifer rootstock will work for the purpose.
.
E-mail your comments to "Ken Peek" at kspeek123@att.net
We hope the information on the PrimitiveWays website is both instructional and enjoyable. Understand that no warranty or guarantee is included. We expect adults to act responsibly and children to be supervised by a responsible adult. If you use the information on this site to create your own projects or if you try techniques described on PrimitiveWays, behave in accordance with applicable laws, and think about the sustainability of natural resources. Using tools or techniques described on PrimitiveWays can be dangerous with exposure to heavy, sharp or pointed objects, fire, stone tools and hazards present in outdoor settings. Without proper care and caution, or if done incorrectly, there is a risk of property damage, personal injury or even death. So, be advised: Anyone using any information provided on the PrimitiveWays website assumes responsibility for using proper care and caution to protect property, the life, health and safety of himself or herself and all others. He or she expressly assumes all risk of harm or damage to all persons or property proximately caused by the use of this information.
© PrimitiveWays 2017