The most important thing you need to make a clay oven, called an horno, is adobe clay. I am lucky enough to live in an area with good adobe clay. There is a Spanish Mission built of the same material not 30 miles away.
I'm not an expert on soil, so I don't know how much clay has to be in your soil to make good bricks. You will have to experiment.
I was inspired to make an horno after seeing pictures of one in the "Bulletin of Primitive Technology", Fall, 1988, #16.
To begin, I broke up a 4' x 4' section of my backyard and soaked it with water. Then I agitated it with my feet until it was a thick liquid.
Next, straw (not hay) was added. I crumbled it with my hands and sifted it over the mud. I ran out of straw and gathered several large plastic bags of summer dried weeds (foxtail, oats, etc.). They worked just as well as the straw. I inspected several of the original adobe bricks and found they did not contain much straw, just mud. Perhaps the local clay is thick enough so that little is needed. I know Charlton Heston made brick without straw in the movie "The Ten Commandments", but I wasn't sure if the Lord would do the same for me, so I kept adding straw just to be safe. The amount depends on your soil. I noted that when the brick had an excessive amount of straw, it did not seem as solid when it dried. Again, this was a first attempt and the ratio of straw to clay is something you will have to experiment with.


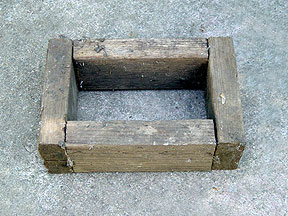
I made a brick mold from 2 x 4s - 7" wide and 10 3/4" long. The interior dimensions make a brick 4" wide by 71/4" long by 3 1/2" tall.
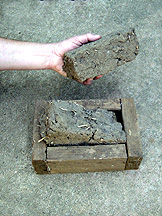
When the clay is thoroughly mixed, sling it into the mold. The soil had lots of small rocks and I removed the largest ones before putting the clay in the mold.
When the clay is level with the top of the mold, take it to an open, sunny spot and slap it down onto the ground. This helps the clay to release from the sides of the mold. If it still sticks, some short, vigorous shakes should remove it. Sometimes I sprinkled dry sandy dirt over the inside of the mold. This helped the wet bricks drop out better. The same principle is used for adding Crisco to a cake pan.
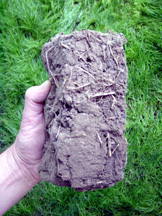 The brick dried in the sun for
about a week.
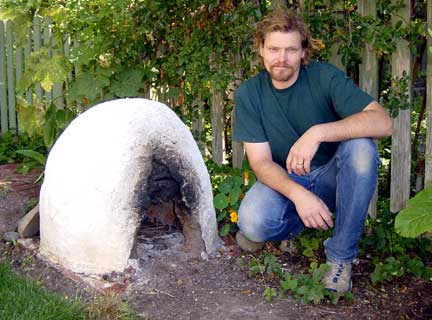
The base for the horno was made from a single layer of commercial red brick approximately 32 inches square. The dried mud bricks were placed in a circle on top of the commercial brick base, leaving an opening for the door about 9" wide. However wide you make the door, make sure it is large enough to accommodate anything you plan to cook in it. The same clay used to make the bricks was also used to mortar them together. Since the bricks are rectangular and the shape of the horno is round, there will be open corners between the ends of two bricks. Fill this in with more of the same clay mortar. Before adding a second layer, dunk the bottom half of each clay brick into water. This helps it stick to the clay mortar. Keep doing this until you have two or three layers.
After two layers of brick, I stopped to let it dry for two days. When adding additional layers of brick, stagger the new layer over the previous layer so the bricks are not lined evenly one above the other. This will make it stronger. You may want to make some shorter bricks or chop one in half to fill in shorter spaces. As the walls grow higher, they must gradually slope inward to make the conical shape of the horno. If your walls do not dry sufficiently, and if they slope inward too sharply, they could collapse. I proceeded slowly and made sure each row dried a bit before adding each new row. Smooth the inside wall of the horno as you go. Fill in any gaps with clay.
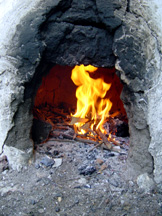
When completed, let it dry thoroughly. If you live in inclement areas, you have to protect it from the rain. I lit a small fire inside and let it burn most of the day to ensure that it was thoroughly dry.
I did not make a smoke hole, and I think I should have. The air for the fire goes in through the door, and the smoke goes out of the door. I think it would be more efficient if there was a small vent near the top of the oven. When thoroughly dry, I plastered the outside with a mixture of commercial mortar and lime, about 1/4" thick. This was an experiment. Plain mortar will work, but I was trying to simulate a homemade lime mortar horno. Before adding a layer of mortar, I dampened the outside of the horno so it would stick better.
When the mortar was dry, I whitewashed it with commercial lime type "S". Hardware stores carry both slaked and unslaked lime. I don't know the difference. You may want to do some research / experiments with this. It is caustic, so wear rubber gloves and eye protection when you use it. For the whitewash, I mixed lime with water to the consistency of thick glue, then slapped it on with a large paintbrush.
I made a rough door from a 2" x 8" pine plank. The door does not fit flush to allow air inside while cooking.
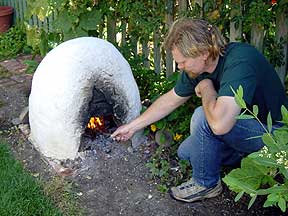
I made this horno four years ago, and it is still standing and works just fine. It is not protected from the weather. However, I have had to add additional layers of thick whitewash to repair cracks.
To cook in my horno, I build a fire and let it burn about an hour. (I've never used a temperature gauge.) Then, after the fire burns down, you may pull out the coals if you wish and slide in the food you want to cook.
E-mail your comments to "Blake Bufford" at dogbane41@netzero.com
We hope the information on the PrimitiveWays website is both instructional and enjoyable. Understand that no warranty or guarantee is included. We expect adults to act responsibly and children to be supervised by a responsible adult. If you use the information on this site to create your own projects or if you try techniques described on PrimitiveWays, behave in accordance with applicable laws, and think about the sustainability of natural resources. Using tools or techniques described on PrimitiveWays can be dangerous with exposure to heavy, sharp or pointed objects, fire, stone tools and hazards present in outdoor settings. Without proper care and caution, or if done incorrectly, there is a risk of property damage, personal injury or even death. So, be advised: Anyone using any information provided on the PrimitiveWays website assumes responsibility for using proper care and caution to protect property, the life, health and safety of himself or herself and all others. He or she expressly assumes all risk of harm or damage to all persons or property proximately caused by the use of this information.
© PrimitiveWays 2017