The wigwam is the traditional lodging of the Anishnaube People (The Ojibway/Chippewa Tribe). Two shapes of wigwams have arisen, due to materials at hand. The conical (tepee) wigwam was common all across the north, while the more well documented dome wigwam was seen in the south of the Ojibway territory.
In the north, where less hardwood is around, straight, dead conifer trees are common. In fact, one is known as the Lodgepole Pine tree due to its constant use by northern tribes as a building material for their homes. Sometimes reaching 50 feet in height, the lodgepole pine can often be found standing dead, towering over the jack pines and balsam firs. Cree, Montagnais, Dogrib and many other northern Canadian tribes would burn the base of the lodgepoles due to the lack of steel cutting tools. The hard wood of pine makes it very difficult to use stone tools. So often, fire was the method of felling such a durable tree. They would then use smaller fires to cut the poles to size.
A tripod would be made, and another thirteen or so poles laid onto this until a frame similar to a tepee was created. The further north one goes, the more large birch are found. Also, due to the cold, the bark is often much thicker, leaving the northern Ojibway tribes with the perfect cover for a wigwam. They would use flakes of chert to make a vertical slit from as high as they could cut (using expedient ladders), to as low as they could cut on a tree. Using hot water and chisel-shaped wooden spatulas, they would loosen the bark off of the tree. Then they would lay it onto the tepee-like frame, starting at the bottom. Often, the weight of the bark alone would keep it in place. However, in windy conditions the bark would be sewn to the poles.
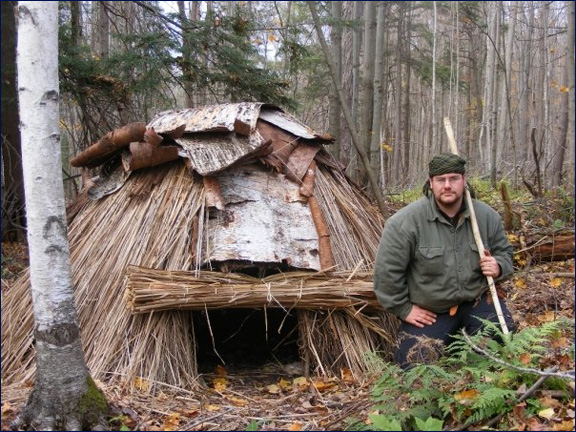
The southern territory of the Ojibway at one point extended from the St. Lawrence River, down to the Ohio Valley, then up to Minnesota. Ash, basswood, maple and oak often grew in this region, all the way into central Ontario (the heartland of the Anishnaube). The saplings of such trees were strong, flexible and fairly rot resistant. Since straight poles were not easy to find this far south, a new form of wigwam had to be made. The Ojibway here (of the Chippewa, Nippissing and Mississauga dialects) innovated their beloved birch bark lodges into bent-arch frames. Once made, the frame would make a dome that could withstand the weight of two tons of snow and hurricane force winds. Though birch bark was present, it was not as thick or as large as it was in the northern regions. The Ojibway (especially the Mississauga and Chippewa) would thatch cattail and bulrush leaves to the frame. Afterwards, they would add hickory or elm bark on the top to help shed the rain and cover the smoke hole.
The dome-frame wigwam is the best documented of the Ojibway dwellings, often being painted by early explorers of the Ojibway Territory. In Ojibway customs, the idea of “The Man of the House” did not exist. The wigwam belonged to the woman. When a man entered, husband or not, he was expected to pay respects to the lodge owner (the wife/woman) no matter what his status was. If a woman was insulted in her own lodge, it was her right to remove whoever the offending individual was. This included such high ranking village members, such as chiefs, medicine men and war chiefs. If a husband disrespected his wife, or a divorce was decided, he would be given his belongings and leave the lodge. The wife kept the cooking utensils, the blankets, the wigwam itself and any other lodgings. Only the man’s personal belongings (medicines, tools, hunting equipment) were allowed to be taken with him. Any items shared with the wife, and used primarily in the wigwam (baskets, fishing nets, birch bark vessels, etc), were ceded to the wife. This is perhaps why often marriages seemed to last in the Ojibway culture.
How to Construct a Traditional Dome-framed Wigwam
(with modern tools or traditional tools)
Tools needed:
a) Knives for peeling bark, branching and other basic chores. Traditionally, flakes of flint, chert or jasper would have been used for this task.
b) 2 axes - For pounding stakes and other heavier work.
c) 2 machetes - For gathering thatching materials.
d) 1 saw - For precision cuts.
e) One burner (long nail, with head cut off, pounded into a hardwood dowel)
d) Post hole digger or a sharp long pry bar. Fire-hardened digging sticks were the old faithful tool for this job.
Steps:
1) Peel poles and soak for at least two days in the lake.
2) While poles are soaking, use twine and bark (from basswood) to make small bundles of thatch out of the 50 bushels of cattail leaves. Bundles should be 2” thick or so. Try to keep them all equal in size. Let these dry in the sun (or warm room).
3) Take the 16 ash poles, pair them up and tie tips (narrow ends) together. After which, using stakes, bend into an arch (use same stakes for all of the poles to make them all evenly shaped). If pole cracks during the bending process, cast them with jute twine. Allow to dry for at least two days.
4) Continue to soak the basswood and thin ash poles during this time. They must remain flexible.
5) Drive a stick into the center of the area planned to be the wigwam site. Make a 5 feet long string with a sharp stick at the end. Drive 16 stakes into the ground at even distances using the 5 feet cord to measure proper distance for each stake.
6) Use pry bar or post hole digger to make foot deep holes where each stake is marked.
7) Set arches into holes and tamp soil down firmly (may have to drive stakes in to help keep the frame strong).
8) Salt the earth that is inside the frame. Plants inside can cause problems later on down the road (rotting of the poles, etc).
9) Wrap basswood and thin ash poles around every 1 1/2’ up the frame. Bend main poles where they seem to be sticking out too far and lash the thin horizontal poles tightly to it.
10) Mark out the most easterly direction and cut the horizontal poles between the two main poles there. This will make the doorway.
11) Begin thatching process, beginning at the bottom. Cattail thatch should be upside down and tightly packed against each other. An easy way of doing this is using one continuous string to lash the thatching on.
12) Once thatching is complete (to the last horizontal pole row), there should be a hole at the very top. This will be the smoke hole.
13) Shake the wigwam to let the thatching fluff and interweave from natural settling. This will make the wigwam more waterproof and windproof later.
14) Use the burner to bore holes along one edge of each birch bark sheet. Do this by laying the sharp nail in a fire and blowing on the coals until the nail is red hot.
15) Use jute twine to lash the birch bark sheets to the second top and the top rungs. These will help in shedding rain on the least angled portions of the wigwam. They should look like shingles. Keep the most intact, largest sheet from being used until step 16.
16) Make sure the largest sheet can cover the smoke hole. Then bore a hole along one side. Lash this side down.
After these steps, other little projects can be made to make the wigwam more traditional and livable:
a) Take a clay-like mud and fill the center of the wigwam with it. After surrounding with rocks, coat them with the clay/mud too. This will make a durable and efficient (not too mention safe) fire hearth.
b) Lash straight poles along the inside of the top of the wigwam to act as a rafter. These can be used to store bags of food, furs and blankets, as well to suspend pots over the hearth for cooking.
c) Weave cattails into a large mat. Make it large enough to cover entrance, and then some. Lash a heavy stick on the bottom end. When you want to open it, roll the mat up and tie in place. When you want to close the entrance, untie the mat. Let the weight of the stick and the mat unroll to hold the cover in place. If pulled out straight and held up with poles, the mat can also act as a sun arbor.
d) Use a strong thick cord (plaited jute will work) to act as weights to keep the thatching and bark shingles in place during hard weather.
e) Weave willow mats (or more cattail mats) to make seats inside. These will help keep the moisture from the ground off of people.
f) Gather heavy furs (bear, bison, even moose) to line wigwam for the winter or for sleeping.
g) A hollow log at the four cardinal directions should be fitted under the thatching. This will help with ventilation and smoke issues. Make sure these are free of snow during winter time.
h) Smoke racks, stretching poles, baskets, fish traps and other projects can often be arranged/built and worked on to make the area more homely.
Altogether, a well made wigwam can take anywhere between a week or three weeks to construct, depending on the details added. Spending a night in such a lodge is a truly spiritual experience. The poles woven together form this upside-down basket and you soon feel a melody of peace wash over you. It is one of many reasons such a shelter is a worthwhile project.
E-mail your comments to "Caleb Musgrave " at canadianbushcrafter@gmail.com
Visit Canadian Bushcraft at http://www.canadianbushcraft.ca/AboutUs.aspx
We hope the information on the PrimitiveWays website is both instructional and enjoyable. Understand that no warranty or guarantee is included. We expect adults to act responsibly and children to be supervised by a responsible adult. If you use the information on this site to create your own projects or if you try techniques described on PrimitiveWays, behave in accordance with applicable laws, and think about the sustainability of natural resources. Using tools or techniques described on PrimitiveWays can be dangerous with exposure to heavy, sharp or pointed objects, fire, stone tools and hazards present in outdoor settings. Without proper care and caution, or if done incorrectly, there is a risk of property damage, personal injury or even death. So, be advised: Anyone using any information provided on the PrimitiveWays website assumes responsibility for using proper care and caution to protect property, the life, health and safety of himself or herself and all others. He or she expressly assumes all risk of harm or damage to all persons or property proximately caused by the use of this information.
© PrimitiveWays 2013