I’ve heard a lot of primitive technologist proclaim that it is difficult, if not impossible, to get a fire-producing spark from any iron pyrite including marcasite. This pre-steel stone on stone technology uses a flint to strike a spark much in the same manner as flint and steel. Yet the ethnographic records, and indeed the archaeological records, show numerous examples of Stone Age “strike-a-light’s” predating the invention of steel. It seemed it must be an effective technology. If it were not more easily employed than friction, it is doubtful it would have been used. Perhaps we moderns just don’t know the details of how it was done. Still, those naysayers were folks who had no problem producing fire with flint and steel. The problem piqued my curiosity, so I began a quest to learn more. This article is an attempt to share an exploration into what it takes to produce an ember with stone on stone fire technology.
The very word pyrite originates from Greece and implies a fiery association. Pyrite is credited as a European precursor to flint and steel and was still in use in circumpolar regions by native peoples during the 1800s.
Part of the difficulty in getting a good spark from pyrite may simply be in the definition of pyrite itself. Iron pyrite is classified as an iron sulfide crystalline mineral. Chemically it is FeS2. Like steel, when tiny pieces are dislodged by a blow, they react with oxygen in the air to produce a hot spark. Those tiny pieces of iron are oxidized extremely rapidly. This exothermic reaction produces heat adequate to ignite a fire. Any hard stone may be used to detach these spark producing particles, but flint or other cryptocrystalline rocks can be shaped and sharpened to work more efficiently.
There appears to be a confusion of terms with respect to the iron pyrites. Pyrite is somewhat variable in its chemical content. Besides iron and sulfur, it can include arsenic, gold or nickel and cobalt. Pyrite also varies in its crystal form. All its variations in form appear as “pyrite” in much of the older literature. Such variation means different pyrites may not respond identically to a flint striker.
Here in California, iron pyrite often appears in its more common blocky, nearly cubic form or as a cluster of cubic pyrite crystals. During California’s Gold Rush it was termed “fools gold” because of its resemblance to gold among those unfamiliar with mining. When a crystal cluster form of iron pyrite is struck or scraped to produce a spark it often crumbles. I’ve also tried to produce a spark using larger, more solid blocky iron pyrite crystals. I grooved the stone to produce a non-slip surface. I scraped down the groove in an attempt to produce a spark. No spark was visible, but I decided it was not possible to be certain without dousing the lights. In the dark it was evident I was indeed producing sparks. The sparks fell sporadically and they extinguished very quickly, often before landing. They did not produce enough heat to ignite tinder. Given that iron pyrites can be quite variable and that I was able to generate a spark at all leads me to believe there is room for more experimentation in this area. The literature implies some early indigenous peoples struck two pyrites together to produce a fire. The question then becomes, “Which pyrite?”
Without completely discrediting the usual form of iron pyrite, I’d like to introduce the reader to a more effective form of iron sulfide for generating sparks. To my mind, the real fire-starting stone is another crystal form of iron pyrite called marcasite. This is also FeS2, but its crystal form is orthorhombic. It often appears in tabular starburst shaped crystals. It forms in sedimentary rock under low temperature and acid conditions. It appears in shale and limestone and in low temperature hydrothermal vents. A rather frail form may be found in coal. Marcasite may also be a replacement mineral in fossils. It often forms nodules or concretions and this is the form most often used to create fire. Marcasite is more brittle and more prone to decay than cubic pyrite. It’s sulfur reacts more rapidly with water. Pyrites form iron sulfate and sulfuric acid and the ferrous iron reacts with oxygen. The sulfuric acid in turn erodes the integrity of the crystal.
Most marcasite concretions or nodules are not shiny like iron pyrite. The exterior of the marcasite nodule turns dark grey or black. This chemical decay of the mineral means the exterior of the nodule is often spent, and is unlikely to generate a spark. If you want to create a spark, you will need to put a groove into your nodule. If you want to preserve the integrity of your marcasite strike-a-light, keep it dry. But don’t worry about burning yourself with sulfuric acid if it gets wet. The acid is not produced rapidly enough to cause a burn.
My husband, Dino, and I visited our friend, Ed Read, in southern California. He referenced an out-of-print publication by Walter Hough. Dino found it on-line, “Fire Making Apparatus in the U.S. National Museum” by Walter Hough. It was published in 1890, apparently as a pamphlet. This document may still be available on-line. Try http://www.archive.org/details/firemakingappara00houguoft. It contains a series of articles and very detailed drawings of items in the museum collection. I reproduced an iron pyrite strike-a-light described and illustrated in one of the articles.
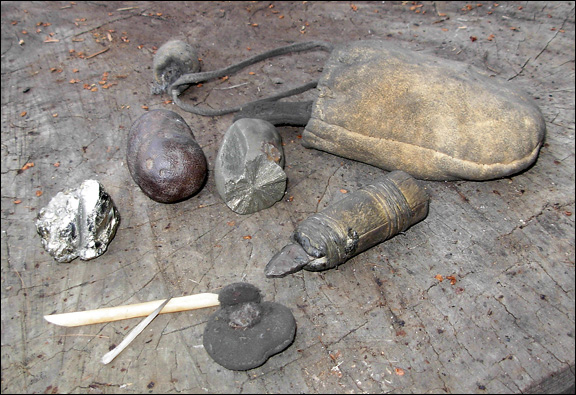
The original kit was collected by Captain E. P. Herendeen from Inuit People in the Cape Bathurst area of Alaska, or possibly the Mackenzie River district at Hershel Island. The original strike-a-light was kept in a reindeer (caribou?) pouch, probably collected in the latter part of the 1800s. The article describes the pyrite as a rounded concretion, and this implies to me that these were not the more common cubic crystal form of iron pyrite, but rather marcasite that occurs in this rounded cylindrical or spherical form.
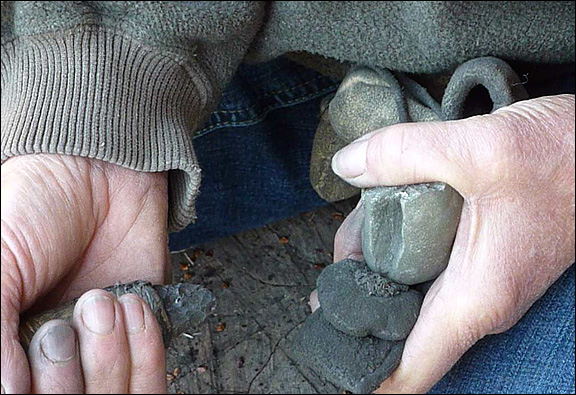
The illustration in Walter Hough’s article shows the top of the pyrite concretion had been popped off and a groove made on one side. This allowed the piece to be held with the thumb on the broken end. The rounded end rested on the fingers as the piece was struck with a flint. The little pouch holding the marcasite and striker had a hair filled “pillow” sewn into the top. The “pillow” folded out to function as a finger guard. The pouch opening was closed with a cord. To the other end of the cord was fastened a smaller tinder-filled pouch. It functioned to secure the pouch to the belt by preventing the cord from slipping out from under the belt and falling. This tinder inside was used to refill a smaller circular, flattened pouch. This smaller pouch had a little trap door on top. In use, it was placed just below the groove to catch the flying sparks. With the trap door open, the tinder was exposed to the sparks. When not in use, the little trap door was closed to extinguish any unwanted coals and preserve the dry tinder. This practice of sealing the tinder after ignition produces a small amount of low oxygen combustion. This adds to the charcoal content of the tinder and perhaps improves its efficiency. When not in use, the small tinder pouch can be kept inside the larger pouch with the marcasite and flint.
Though not listed as a part of the original kit, a bone needle was added to my kit to assist in freeing the ember and transferring it to a tinder bundle. From there it can be blown into a flame.
The Herendeen article illustrates a small, hafted flint striker, but notes these strikers were not always hafted. I hafted my replica because a small flint can be very awkward to hold, and I wanted something small and light to carry inside the pouch.
Once I got the tinder mix dialed-in, I was delighted with the ease of fire making using this device. It does require excellent tinder, a little practice and a sharp flint. It provides me with an average of one fire per 5 strikes (scrapes).
Watch a QuickTime video of the marcasite strike-a-light.
Here are some tips for those of you who are interested in creating and using your own kit.
TROUBLE SHOOTING:
Problem # 1 - Crumbled or broken marcasite
Problem #2 - No spark
Problem #3 - No ignition of spark
Problem #4 - Marcasite slips out of position
Finding Marcasite:
Best of luck to those of you who wish to try this ancient technique yourselves. I hope you will consider contributing to our knowledge by publishing your discoveries and experiences on PrimitiveWays.com.
![]()
We hope the information on the PrimitiveWays website is both instructional and enjoyable. Understand that no warranty or guarantee is included. We expect adults to act responsibly and children to be supervised by a responsible adult. If you use the information on this site to create your own projects or if you try techniques described on PrimitiveWays, behave in accordance with applicable laws, and think about the sustainability of natural resources. Using tools or techniques described on PrimitiveWays can be dangerous with exposure to heavy, sharp or pointed objects, fire, stone tools and hazards present in outdoor settings. Without proper care and caution, or if done incorrectly, there is a risk of property damage, personal injury or even death. So, be advised: Anyone using any information provided on the PrimitiveWays website assumes responsibility for using proper care and caution to protect property, the life, health and safety of himself or herself and all others. He or she expressly assumes all risk of harm or damage to all persons or property proximately caused by the use of this information.
© PrimitiveWays 2016