Some wonderful factory-made archery gear is available today. It is efficient and capable of great accuracy. But to enjoy archery, or to get meat for the table, it is not essential to have the very latest commercial equipment.
Making your own gear is a good option. Our ancestors made bows and arrows for thousands of years with very basic tools and materials, and we can do the same today. Just because a bow is primitively produced, it does not mean it will be no good. Simple bows and arrows crafted from natural materials can still regularly hit the bullseye or help you bring home the bacon.
There are many different types of bow and arrows, but here are some ideas for producing a bow and arrows as quickly and as cheaply as possible.
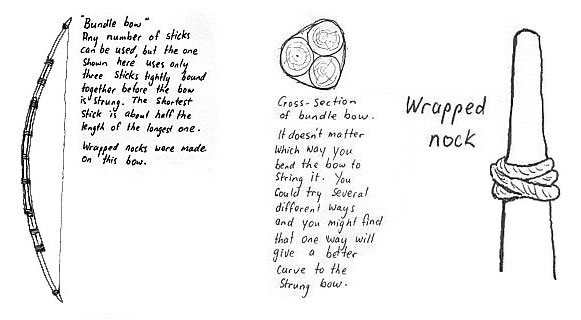
THE BUNDLE BOW
This bow is made from several, reasonably straight sticks (or similar objects) of fairly uniform thickness that are bound together into a bundle. A single, plain stick with a string tied to it will make a bow of sorts, but it may be likely to bend too much in the middle and be inefficient. An efficient bow carved from a single piece of wood will generally be quite tapered towards both ends to balance the leverage applied by the string so that the bow bends evenly throughout both limbs. A bundle bow is generally made up of sticks that are tied together in such a way to achieve a similar taper.
Three sticks of a similar diameter (and a fairly uniform thickness for their whole length) can make a good bow. The shortest stick should be around half the length of the longest one. The middle-sized stick should be about three-quarters the length of the longest one.
Small saplings can be cut and seasoned to make a bundle bow, but a suitable variety of seasoned bamboo may perform a little better because of its comparatively low weight. Some varieties of bamboo seem to be quite unsuitable for this purpose. Old fibreglass fishing rods might be something to consider. The thicker the sticks, the harder it will be to draw the bow. If you are going to use solid sticks, and you can't find ones that are the right diameter, you could try thinning them down or tapering them. Your first bow might not be a wonderful performer, but you are likely to learn something from making it.
When choosing bow-making materials, or thinking about a good design for a bow, it is good to try to keep the outer ends of the limbs as light as is practically possible. This does not mean that you should choose the lightest possible wood to make a bow... some of the most "recommended" bow woods are relatively dense and heavy, and light woods are generally not recommended for bow making. If you only have light wood available, then perhaps you should experiment with it. You may be surprised at what is possible.
It is often recommended that a bow should be longer than twice
your draw length (the greatest distance between the back of the
bow and the bow string when the bow is fully drawn). Twice your
draw length plus 20% might be a good guide to start with. A shorter
bow may shoot a little faster and be more convenient to carry
than a longer bow, but it may be more likely to fail. A longer
bow may help you shoot more accurately and will probably be a
bit more durable. It is good to experiment. For a start, you might
like to make your bow nearly as tall as yourself - up to your
forehead perhaps.
Freshly cut wood and bamboo should dry (season) quicker indoors. Thin sticks and roughed-out bow staves may be dry enough to turn into a bow within two or three weeks if the drying conditions are good. Fresh, green wood will make a bow of sorts, but it is unlikely to be as efficient as a seasoned bow, and it may "follow the string" (stay bent when you unstring it) more than a seasoned bow.
The diagrams accompanying this article are, hopefully, fairly self-explanatory. Plenty of strong, tight bindings should be applied to stop the sticks slipping. Strong adhesive tape may be a suitable alternative in some cases. The sticks will be more securely held together if the smallest stick is tied (at least at each end) to the longest stick first. Then the next longest stick should be tied in place and so on. If all the sticks are simply picked up as a bundle and the only binding to be applied goes around the outside of the bundle, some of the smaller sticks may move when the bow is flexed.
On many traditional bows carved from one stick, nocks are cut near the tips of each limb to hold the bow string. Instead of using cut nocks, the bow string can be stopped from slipping down the bow by applying a tight wrapping of cord or leather strapping around the end of the limb. This "lump" of cord may be more secure if it is glued into place (see diagram).
THE BOW STRING
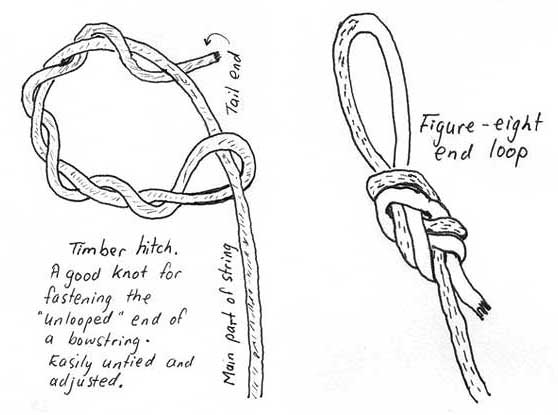
It is said that a bow string should have a breaking strain of four or five times the draw weight of your bow, and that it shouldn't stretch too much (this reduces the efficiency of the bow). All sorts of fibre can be used to make a bow string. The making of a traditional string or a natural fibre string are good skills to learn but they are beyond the scope of this small article. However you can just use a single piece of cord as a bow string.
Many of my own strings are made up of three lengths of polyester butchers twine. I plait an eye into one end and twist the strands loosely to form the main part of the string.
It is not essential to have a special plaited or braided loop (or eye) to fasten your string to your bow. One end can be tied with a timber hitch knot, and the other end can have a loop formed by a knot. To form the loop I do not recommend a bowline - I think this may weaken the string too much for a powerful bow. I prefer a figure-eight loop
The string should be just long enough to create the right gap between the string and the bow when the bow is strung. Some people use a gap of one "fistmele". A fistmele is the distance between the top of your thumb and the bottom of your fist when you give a "thumbs up" sign.
STRINGING THE BOW
I prefer to string my bows this way.... I slip the loop over
the top limb and let it slide down the limb below the nock. The
other end of the string is fastened to the other nock. The handle
of the bow is held firmly in my left hand with the belly facing
away from me. The tip of the lower nock is jammed against the
instep of my left foot. I push the upper limb of the bow with
my right hand while pulling the handle toward me. My right hand
also grips the upper
loop of the string. As the bow bends I slide the top loop of the
string upwards and place it in the nock. I don't pull the bow
directly towards me; I pull it slightly sideways so that if something
slips or breaks it is less likely to strike me in the face. I
also turn my head to my left to protect my eyes and this means
that I have to slide the string into place by "feel"
rather than looking at what I am doing. This method of stringing
works best with notched or post nocks - wrapped nocks don't allow
the loop to slide up the limb easily.
If your bow is relatively strong and/or your nock and string
loop are not suited to this method of stringing the bow, then
you may have to use another method. Sometimes I have strung a
bow by placing the lower limb tip across my left foot with the
belly facing upward. I then step over the bow with my right leg.
I hold the upper limb with my right hand and lift the bow as high
as necessary to get the belly side of the handle behind my right
thigh. I use my left hand to put the string in place while I bend
the bow with my right hand. (The string will already be fastened
to
the lower nock and should pass in front of your right leg). When
the bow is strung correctly you will find that your right leg
is between the stave and the string. Care has to be taken not
to over-bend any part of the bow during this process.
Sometimes a particularly long or heavy bow can be strung by placing the lower limb on the ground with the belly facing upward. The right hand grips the upper limb just below the upper nock. The upper nock may be about half a metre off the ground at this stage. The left knee is then placed on the handle area and the weight of the body is brought down on the handle. The string is already fastened to the lower nock, and when the bow is bent enough the string is fixed to the upper nock.
It is best to unstring the bow when it is not in use.
OTHER BOWS
Excellent bows can be carved from a single stave of wood, or they can be laminated. If you are making a laminated bow, the layer on the back (the side furthest from the archer) should be strong in tension. The belly side (facing the archer) should be strong in compression. Instruction for making these bows is beyond the scope of this small article, but the process is reasonably straightforward and there is plenty of information available in books and on the internet. Most primitive bows would have been carved from one solid stave of wood.
ARROWS
Arrows can be made from purchased dowelling, or purpose-made arrow shafting. Alternatively, you can cut, or split, suitably-sized lengths of straight-grained timber and then make these round with a plane and sandpaper (or something similar). If you are using any of these options, you have to make sure that the shafts have a nice straight grain running parallel with the shaft. If the grain runs at too much of an angle to the shaft, the arrow is likely to break at this point. It is a nuisance to have an arrow break when it hits the target, and it is even worse if the arrow breaks while you are shooting it and a sharp part of it penetrates your arm or hand. You can test shafts to some extent by bending them with quite a degree of force. It is better to break them before you fix the fletchings and the points. You may have to straighten the surviving shafts by applying gentle hand pressure.
Many arrows have been made from natural shoots. These generally have to be dried, straightened and trimmed to the right diameter before an arrow can be made from them. Many species of plant will grow shoots that can be turned into arrows, but some may have better qualities than others. Finding strong shoots of the right weight that don't have a tendency to constantly bend may be a challenge. Some shoots may split more if you peel them before you dry them, but peeling may speed the process.
Some folks place a lot of importance on having the correct "spine" or stiffness in an arrow. After shooting many arrows I feel that spine may not be as critical as some folks believe. Perhaps my style of shooting compensates for differences in spine. Perhaps my shooting is not consistent enough for me to notice the difference anyway. Anyhow, rather than getting too concerned about spine, the beginner may as well just make some arrows from shafts that seem to have the right "stiffness" and see how they shoot. My current thinking is that longer arrows are generally better when it comes to accuracy and hitting power, so I would suggest that you make them at least a couple of inches longer than your draw length.
It is a good idea to hand-straighten the shoots as they dry. Sometimes dry shafts will straighten more readily if the bent area is rubbed with fat and then heated above a candle flame immediately prior to straightening (don't scorch the arrow). If using heat, it is a good idea to hold the arrow in the straightened position (or a little past it) for a short time while the wood cools down. An arrow straightening tool can be useful if the bend is tight or right at one end of the shaft. This tool might consist of a suitably-shaped piece of wood at least three-quarters of an inch thick with a hole drilled through it near one end. The hole is passed over the shaft, and the wood is levered to straighten the arrow.
Nocks can be cut into the arrow using hacksaw blades that have been taped together to create a slot that is just the right width. This slot can be smoothed with sandpaper or a thin file. All sorts of nocks sizes will work, but a nock that just lightly grips the string is what I prefer. The nock should be deeper than the thickness of the string. Nocks can also be filed or even carefully whittled with a thin blade. It is a good idea to make a small binding of fine cord in front of the nock if there is a possibility that the shaft might split.
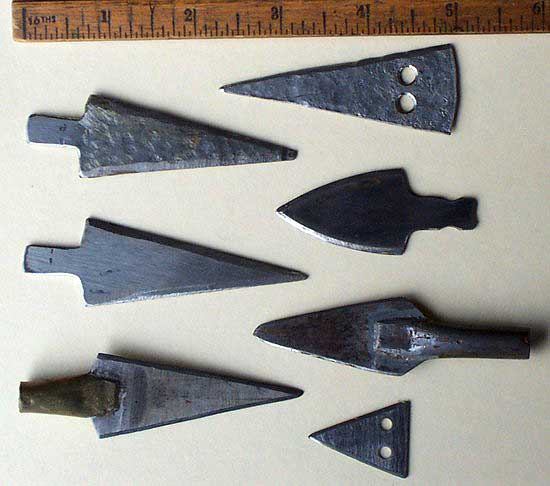
Arrowheads are a big topic on their own. I have hunted using simple broadheads that have been cut from sheet metal that is about 1.6mm thick. These are glued and bound into a slot at the business end of the shaft. More elaborate broadheads can be made by soldering a blade into some suitably-sized tubing. I have used cartridge cases and steel tubing for this purpose. Broadheads should always be very sharp when hunting.
Fletchings have been made from feathers for a long time. The three-feather fletch is the most common configuration, but some folks use a four or two-feather fletch. Commercially made plastic vanes are another option.
I prefer to use feathers, but I have had very good results using fletching made from adhesive tape. This might not seem primitive in a pure sense, but it is a great option to get your arrows flying if good feathers aren't easy to get. Some tapes are more suitable than others. The correct "stiffness" is hard to describe, it shouldn't be too flimsy or too stiff, but remember that the fletch should be able to bend out of the way as it comes in contact with your hand or the bow. I have had success with tape made for repairing rips in plastic hay bale covers. I have also got reasonable performance from two or three other types that I have tried. Tape that comes on rolls about 48 millimetres wide is convenient to use.
Cut three bits of tape about 150 millimetres (about six inches) long. Pick up one piece and bend it lengthwise to form a "U" with the sticky side outwards. The base of this "U" is stuck lengthwise along the shaft. Now pick up the second piece and bend it like the first one. This one will be stuck in position a third of the way around the shaft from the first one, while the first bit of tape is still bent in the "U" position to keep it out of the way. Things can get a bit tricky here because the two bits of tape can stick to each other before you are ready. If you feel that the two bits of tape are sitting in the right position, you can allow the two adjacent wings of tape to stick to each other, thus forming the first complete vane. Mould the tape against the shaft to get it to stick well. The two bits of tape will sometimes stick without being exactly in the right position thus skewing the vane or making it lumpy. Now the third piece of tape is applied in a similar manner.

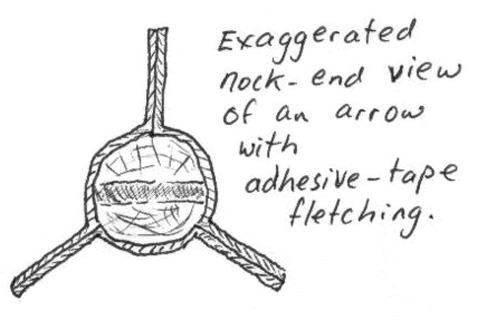
A big challenge with this tape fletching is to get three nice, flat, evenly spaced vanes. This should come with practice. Another challenge is to end up with the vanes where you want them in relation to your nock so that you get the conventional "cock and hen feather" configuration with the cock feather at right angles to the plane of the nock. If your fletching job isn't very neat, you may find that the arrow will still fly fairly well.
Once you have the tape firmly pressed into place, you can trim the vanes with sharp scissors. I have found it necessary to have the vanes tapering down to nothing at the leading end so that they ride nicely past the bow and my bow hand. Keep the vanes as narrow as possible. Make the taper as long as possible. I apply a tight wrap of soft insulation tape over the very front end of these plastic vanes to stop them catching and pulling away.
If you want a more primitive alternative to feathers you could try binding tufts of fibre to your arrows. I have had reasonable success with this method on long arrows. If you don't have an arrow rest on your bow and just shoot "off your hand", then you have to be careful that the fibre is tidily bound so there aren't any big lumps or spikes to damage your bow hand as the arrow flies past.
E-mail your comments to "Stephen Coote" at srcoote@gmail.com.
We hope the information on the PrimitiveWays website is both instructional and enjoyable. Understand that no warranty or guarantee is included. We expect adults to act responsibly and children to be supervised by a responsible adult. If you use the information on this site to create your own projects or if you try techniques described on PrimitiveWays, behave in accordance with applicable laws, and think about the sustainability of natural resources. Using tools or techniques described on PrimitiveWays can be dangerous with exposure to heavy, sharp or pointed objects, fire, stone tools and hazards present in outdoor settings. Without proper care and caution, or if done incorrectly, there is a risk of property damage, personal injury or even death. So, be advised: Anyone using any information provided on the PrimitiveWays website assumes responsibility for using proper care and caution to protect property, the life, health and safety of himself or herself and all others. He or she expressly assumes all risk of harm or damage to all persons or property proximately caused by the use of this information.
© PrimitiveWays 2013